Basic Use Of Manipulators And Wiring In 3DSMAX 4.x"

by Ofer Zelichover

This Tutorial describes the basic use of manipulators and wiring in 3ds Max 4.x.
Manipulators allow for easy manipulation of objects's parameters, thus making it easier to animate, using on screen sliders, plane angles and cone angles.
The main feature that allows this to happen is wiring. Wiring is a very powerful, yet easy to use tool. In this tutorial, we'll only look at very basic wiring, however, if you're familiar with expressions, you can harness the full potential of this tool.
In this tutorial, we'll create a VERY basic eye model, and assign sliders to the eyelids. This tutorial assumes basic knowledge of 3dsmax.
I hope you'll find it helpful.


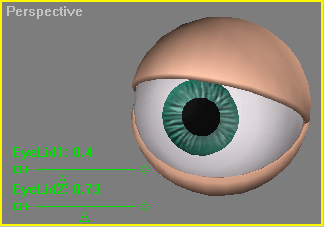
OK, let's start. First, lets create the eye. Our eye for this tutorial is going to be made of one sphere for the eye, and two hemispheres for the eye lids.
Create a sphere with a radius of 50, next clone it twice. Make sure the position of all 3 spheres is the same.
Change the radius of the two new clones to: 55, and the Hemisphere value to: 0.5.
Rename the first sphere to "Eye", one hemisphere to "EyeLid1" and the second hemisphere to "EyeLid2".

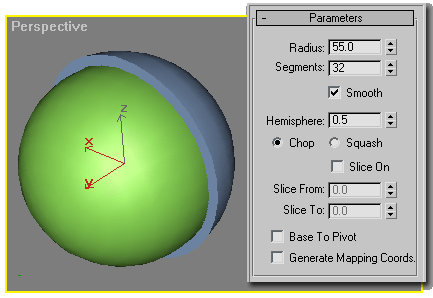
Create the spheres so you'll get something like this. (There are 1 whole sphere and 2 hemispheres here).
You can use clone (Edit > Clone) to clone the objects without moving them, so the centers will remain in the same place.


Next, change the two hemispheres' rotation controllers to Euler XYZ, so we'll be able to control the rotation along one axis only.

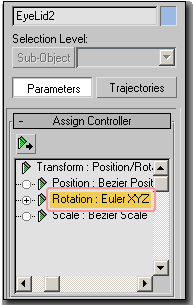
Change the two hemispheres' rotation controllers to Euler XYZ.


Now we'll create the slider manipulators. Manipulators are a new kind of helpers. In max 4.x there are three types of manipulators:
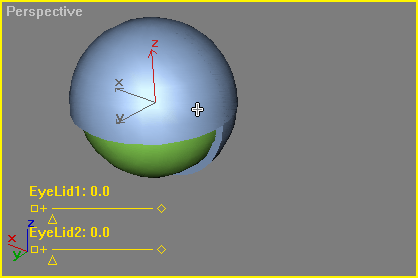
(1) Slider
(2) Angle
(3) Cone Angle


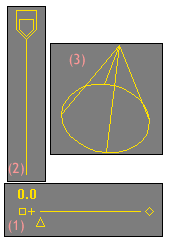
In this tutorial we'll use the slider manipulator.
Create two slider manipulators as shown.
Use the "Label" field in the parameters rollout to name the sliders, for easier handling.

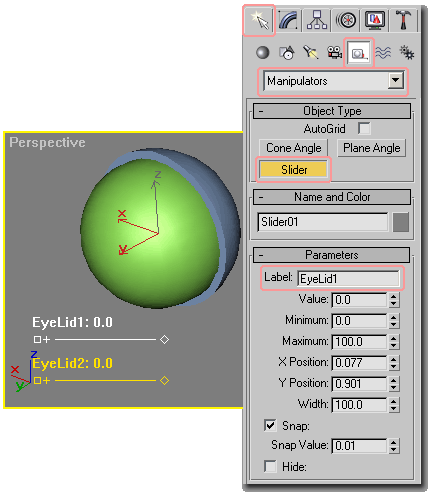
The manipulators are under helpers (Create Panel > Helpers > Manipulators). Create two slider manipulators by clicking in the viewport with the "slider" button pressed.
Use the "Label" field to give the slider the name to be shown in the viewport.


Update the min. value to: 0.0 and max. value to: 1.5 for both sliders.
In Euler XYZ the angle when using wiring is in rad., this is why we use these values here. If you want to use degrees, you'll have to convert the values in the wiring dialog (I'll show where later), however, the exact way to do that is beyond the scope of this tutorial.

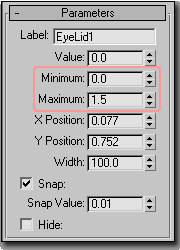
Update the minimum and maximum values of both sliders to 0.0 and 1.5 accordingly.


Wire the eyelids to the corresponding sliders. The wiring can be accessed from the "Quad Menu" (right-clicking the object).

Select the first eyelid, right-click on the selected object, and select the rotation x from the wiring menu: (Quad Menu > Wire Parameters > Transform > Rotation > X Rotation).
Click over the slider you want to wire the eyelid to, and select value (Object (Slider) > value).


Once you selected "value", a "Parameter Wiring" window will pop up. Here is where the magic is done.
The "Parameter Wiring" window allows you to define the way a parameter of an object will affect another parameter of another object.
In the top part are the "Tree Views" where you select the object's parameters to work with. Between the two "Tree Views" are the "Control Direction" buttons. These define the direction of control.
Below them are the "Connect/Disconnect" buttons, and below them are the "Transfer Expression boxes". In these boxes you can write expressions just like in an expression controller (they follow the same format).
You can also access the "Parameter Wiring" window from the "Animation" menu.


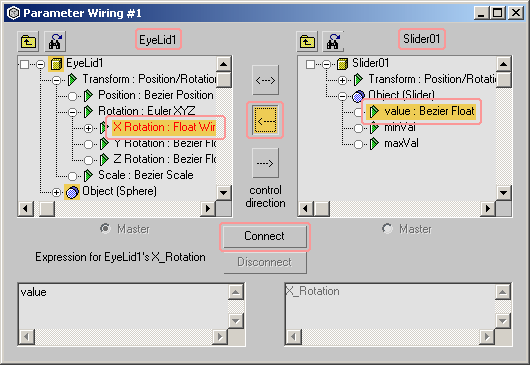
Make sure the right parameters are selected for each object (eyelid's x rotation and slider's value)
In the "Control Direction" buttons select the one that points from the slider's side to the eyelid's side, and press connect.


Wire the second eyelid to the second slider in the same way, only notice to enter "pi-value" in the "Transfer Expression box" of the eyelid.
We enter here pi-value to get the rotation in the opposite direction (remember that the Euler XYZ values are in rad. in parameter wiring).

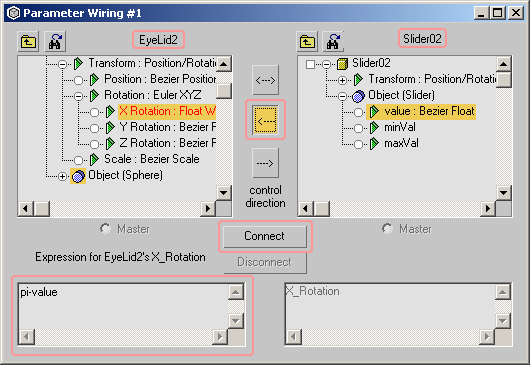
Wire the second EyeLid to the second Slider as before. When the "Parameter Wiring" window pops up, make sure to write pi-value in the expression box of the EyeLid before you connect. If you connected before changing the expression, you can always change the expression and press the "Update" button (the "Connect" button will turn to "Update" once you connect the parameters).


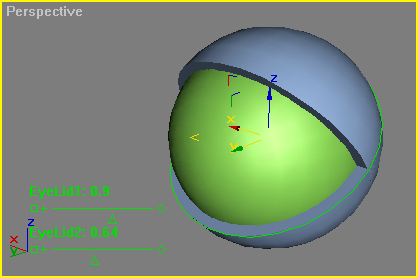
That's it, now you can use the sliders to control the eyelids.
To change the values of the sliders you use the "Select and Manipulate" tool (the icon).

Use the "Select and Manipulate" tool (the icon) to change the slider value and control the eyelids. The slider value can also be animated, of course.


I hope you found this tutorial useful, if you have any comments or suggestions, please let me know.